Thursday, May 31, 2012

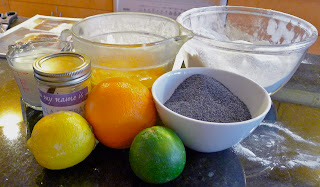
Citrus Poppy-seed Cake

Happy Birthday Caitlin!


May 17th was Caitlin's Birthday! And as is our tradition I made her a fabulous cake. Last year she made me a six layer rainbow cake! This year I went with Citrus Poppy-seed Cake from Martha Stewart Desserts, with an Ombre Marshmallow Fondant icing.


It's a three layer cake with a delicious cream cheese icing in the middle. Martha's recipe calls for a lemon glaze to cover, but I went with fondant instead.


It was my first time covering a cake with fondant, and it was tough!


There was definitely a pretty side, and a not so pretty side. But still delicious.

I made the fondant icing and cream cheese icing ahead of time, then baked the cake and assembled on the same day. 


Citrus poppy-seed cake

1 1/2 cups  unsalted butter room temperature
3 3/4 cups  all-purpose flour
2 1/2 tsp   baking powder
3/4   tsp   salt
2 1/2 cups  granulated sugar
7 lrg       eggs room temperature
1 1/2 tsp   pure vanilla extract
1     cup   milk  room temperature
1   tblsp   lemon zest
1   tblsp   lime zest
1   tblsp   orange zest
1/3   cup   poppy-seeds

1. Heat oven to 350 C; arrange two racks in the centre of the oven. Butter three 8-by-2-inch round cake pans. Butter pans, then dust with flour and tap out the excess. Set aside.

2. Sift together the flour, baking powder, and salt in a medium mixing bowl. Set aside.

3. Beat butter until lightened, 1 to 2 minutes. Gradually add sugar; beat until colour has lightened, 3 to 4 minutes. Add eggs, a little at a time, until smooth and fluffy. Beat in vanilla.

4. Reduce mixer speed to low. Alternately add the flour mixture and the milk, a little of each at a time. Add in citrus zest and poppy-seeds.

5. Divide batter between the three pans. Bake for 45 minutes or until a toothpick into the centre comes out clean, rotating the pans half way round half way through the bake time. Let cool on wire racks.


 6. Once cakes are cool lay one layer on a cake plate. Spread enough cream cheese icing to cover cake layer within one inch of edge. Press next layer of cake on iced layer, pushing icing to edge. Repeat for next layer.


7. Roll out fondant and wrap around cake. (I don't have the best tips for this as my cake had some seams and winkles. A crumb layer of icing helps the fondant stick to the cake.)

8. Decorate top of cake with some more citrus zest!


Since I was covering the cake with fondant instead of a lemon glaze, I added lemon juice to the icing to keep the citrus taste evident. I only used a regular 250 g container of cream cheese and added the lemon juice and zest of what I had on hand. The butter and sugar I also cut to about half. In truth I didn't measure. But here is martha's recipe with my citrus additions. 

Lemon cream cheese frosting

12  ounces cream cheese at room temperature
6   tblsp  unsalted butter at room temperature
3   cups   confectioners' sugar
1/2 tsp    lemon zest
1/2 tsp    lime zest
1/2 tsp    orange zest
juice of one lemon


1. Beat cream cheese until smooth. Add the butter, and cream until smooth. Add lemon juice.

2. Add confectioners' sugar and mix until completely combined. Add zest.

3. Beat frosting until smooth and fluffy. Chill for three hours or overnight.


*If you would like to cover with lemon glaze here is the recipe.

Lemon glaze 

1 1/2 cups confectioners' sugar
3-4   tsp  fresh lemon juice
2     tsp  poppy-seeds

1. Place sugar in a medium bowl. Gradually add lemon juice, stirring with a fork until smooth. The mixture should be slightly thick but pourable. Stir in poppy-seeds. Pour over cake and let it run down sides.

Wednesday, May 23, 2012

Marshmallow Fondant


I have wanted to try fondant icing for quite a while. However I've heard that it's not that tasty and it seemed like it might be hard to do. Then last week I saw this recipe in the Globe and Mail for Mother's Day. It sounded really straight forward and easy, and it was!

The recipe calls for mini marshmallows, shortening, food dye and icing sugar. I could not originally find miniature marshmallows, so I used large ones, and I do not have a microwave. This meant melting the marshmallows in a double boiler (which I also don't have, so really a bowl over a pot of boiling water). The recipe also recommends gel or powder food dye but I used regular liquid food dye which worked just fine. I do believe you can get more vibrant colours from gel and powder dyes. However I've never used them, is this true?

The fondant was really quick and easy to make, and it was fun to knead it together and see it take shape. The longest part was rolling it out and cutting the pieces and shapes. Then gluing them (with icing) individually to each cupcake. You can follow the steps from Stephanie Eddy but I found you don't really need to follow specific measurements. Steps to how I made the fondant are below.


I needed something to put the fondant on, so I made Vegan Marble Cupcakes. Also delish and easy!

I used Joy the Baker's chocolate cupcake recipe from her recipe for chocolate peanut butter cupcakes (!) and Golden Vanilla Cupcakes from the book Vegan Cupcakes Take Over the World, which just might be true. Alternate chocolate and vanilla batter into your cups until they are three quarters full then grab a toothpick and give 'em a swirl.


Marshmallow Fondant

1. Melt a bag a marshmallows in a bowl over a pot of boiling water, or in the microwave.
2. Once marshmallows are fully melted, stir in food colouring if doing so. Then start adding icing sugar a 1/4c at a time and stirring into the marshmallows.
3. Keep adding sugar until mixture forms a sticky ball, and it becomes difficult to incorporate the sugar. Then grease up your hands, and start kneading in more icing sugar, until you get a firm, dough like consistency, that doesn't have sticky spots.
4. You can either immediately start rolling out your fondant, or store it up for three months in a cool dry place. Just rub some shortening into your dough ball to keep it moist and then wrap securely in plastic wrap and a ziploc.
5. To roll out your fondant use shortening to grease your rolling pin and rolling area, or icing sugar if it becomes too sticky, instead of flour. Just remember, the icing sugar will make the colour of the fondant dull.


Overall I'd say the finished project was fantastic, so well worth it! Also I made the fondant ahead of time, then just warmed it up to decorate the cupcakes I had made.  It was easy to get the fondant malleable again, I just left it in the sun while the cupcakes baked! (Remember, no microwave).

Tuesday, May 15, 2012

Look, no hands!

It has been so nice and sunny and hot for may! Yesterday I had a soccer game and even in the setting sun it was painfully hot to be running around. It must have been 20 c.
Anyways, I think I've watched this video of no handed bike moves about once a month throughout the winter.It might not look like much at first, but the moves get more and more hilarious and the music is so good. If it doesn't make a you a bit happier and excited for summer bike rides, then I don't really understand you.


Yay for summer on its way! And not to brag... but I'm a genius at ridding my bike with no hands.


Video via size too small.

Thursday, May 10, 2012

Blackberry Vanilla Glaze Cupcakes for Mom


I'm going on a road trip with my mom this weekend and I'm bringing these as a snack for the ferry. They may not be the prettiest things ever, but they were made in a big rush and taste  good. Recipe is here. 
My mom is rad and we're going on a dorky bird watching expedition to an island where we've spent countless summer days in the past. The weather is supposed to be really great this weekend too. Cupcakes and bird watching. Best daughter ever. 
Have a great mother's day!

Monday, May 7, 2012

Pavlova with Orange Yogurt and Raspberries


My good friend Jess introduced me to pavlova. Her dad is Australian, and pavlova is their national dessert. I think I love pavlova almost as much as Jess does. Beautiful meringue, crunchy on the outside and soft on the inside with billowy whipped cream and fruit. Its pretty much perfect. Last month I was at her beautiful wedding in Oakland. Since pavlova is her favourite, her mom Judy made two for the post-wedding brunch. Although a bit hung-over I managed two slices and got a copy of the recipe for myself.


Pavlova is notoriously tricky, which was why I had always hesitated to try it. Apparently you have to avoid having any oil anywhere near the cooking implements and if its a humid day the pavlova could turn out to be a sticky mess. Since I live in a rain forest and my kitchen aid has met its fair share of butter I didn't have high expectations. But despite all that I thought it was actually fairly easy.

Just four egg whites, a cup of sugar, a bit of vanilla, cornstarch and vinegar and the beaters do all the work for you.

Side note Leeks from the garden!- I made the pavlova for our 'family' dinner night, which is a once a week meal that rotates between four or five good friends. To my delight leeks  will grow year round in a West Coast garden, so I highly recommend.


 Maybe a bit sadly, the leeks were the definite highlight of my dinner. Just cleaned off, cut in half and braised with a couple pats of butter, salt and pepper in a hot oven and they were off the hook delicious.  I got the below chicken dinner idea from this recipe on Roost. It was pretty great, I just didn't cook my chicken long enough and it had to go in for another few minutes. Stress! But yes, the leeks were the best and easiest part.

Okay, back to pavlova! I did make one serious deviation from the traditional pavlova, which was to use greek yogurt that I sweetened slightly with icing sugar, a bit of orange juice and orange zest instead of the usual whipped cream.(Inspiration came from a weight watchers book, and I had forgotten to pick up whipped cream, but don't judge, it was good!). It was a nice swap from whipped cream if you want something a bit more tangy or lighter.


This was so good. I ate probably half of it, but my guests enjoyed it as well. The yogurt with orange zest is delicious with raspberries. Also, this picture was taken in my bathroom, so excuse the strange backdrop. Nice bathroom pattern right? It was the only place with decent light.

This was my first pavlova, I was intimidated, but I have to say it's easy, and so so so good. I will be making several more this summer. Something like this maybe?

For the Pavlova (recipe from Judy Sutton):

4 egg whites (room temperature best)
1 cup of sugar
1 tsp corn starch
1 tsp vanilla
1 tsp white vinegar

Whip the egg whites until frothy, and slowly add the sugar. Keep whipping until the eggs whites get stiff and glossy, then fold in the cornstarch, vanilla and vinegar.

On a piece of parchment trace a circle the size you want your pavlova and gently scoop the eggs whites on to it. Make a little nest in the middle with the back of a big spoon.

Stick in a 200 degree oven for an hour and a half (no peeking!) and then let cool with the oven door slightly a jar. (The original recipe said 250 degrees, but mine got a bit of colour in it and slightly too crispy so I think a lower temp would work better, but it might depend on your oven).

For the filling (adapted from Weight Watchers):

1 cup greek yogurt
zest of 1 orange
1 tsp orange juice
2 tbps icing sugar (plus more for dusting)
1 1/2 cups of raspberries

Whip the orange juice, zest, icing sugar and yogurt together to taste. Gently  place in pavlova, sprinkle raspberries on top and dust with icing sugar.

Enjoy!